

WordPress doesn’t allow sorting taxonomies (e.g. Categories) manually, it does provide sorting by name, slug, or term ID, and developers frequently need a manual control over the display order of their categories, product categories, tags, or custom taxonomy terms.
This article provides a comprehensive, step-by-step guide on how to achieve default and custom taxonomy ordering using the powerful JetEngine plugin from Crocoblock, leveraging a dedicated meta field for priority control. We will focus on creating an order_priority meta field and using it to dictate the display sequence of your terms.
Using JetEngine custom meta field for sorting taxonomies makes this possible without installing another, perhaps outdated, plugin on your website.
How to Order WordPress Taxonomies with JetEngine
Whether you are working with a custom taxonomy you created with JetEngine or a built-in one like WooCommerce Product Categories, the principle for custom ordering remains the same: attach a numerical meta field to the term and instruct the display widget to sort by that field.
Step 1: Create the Custom Priority Meta Field
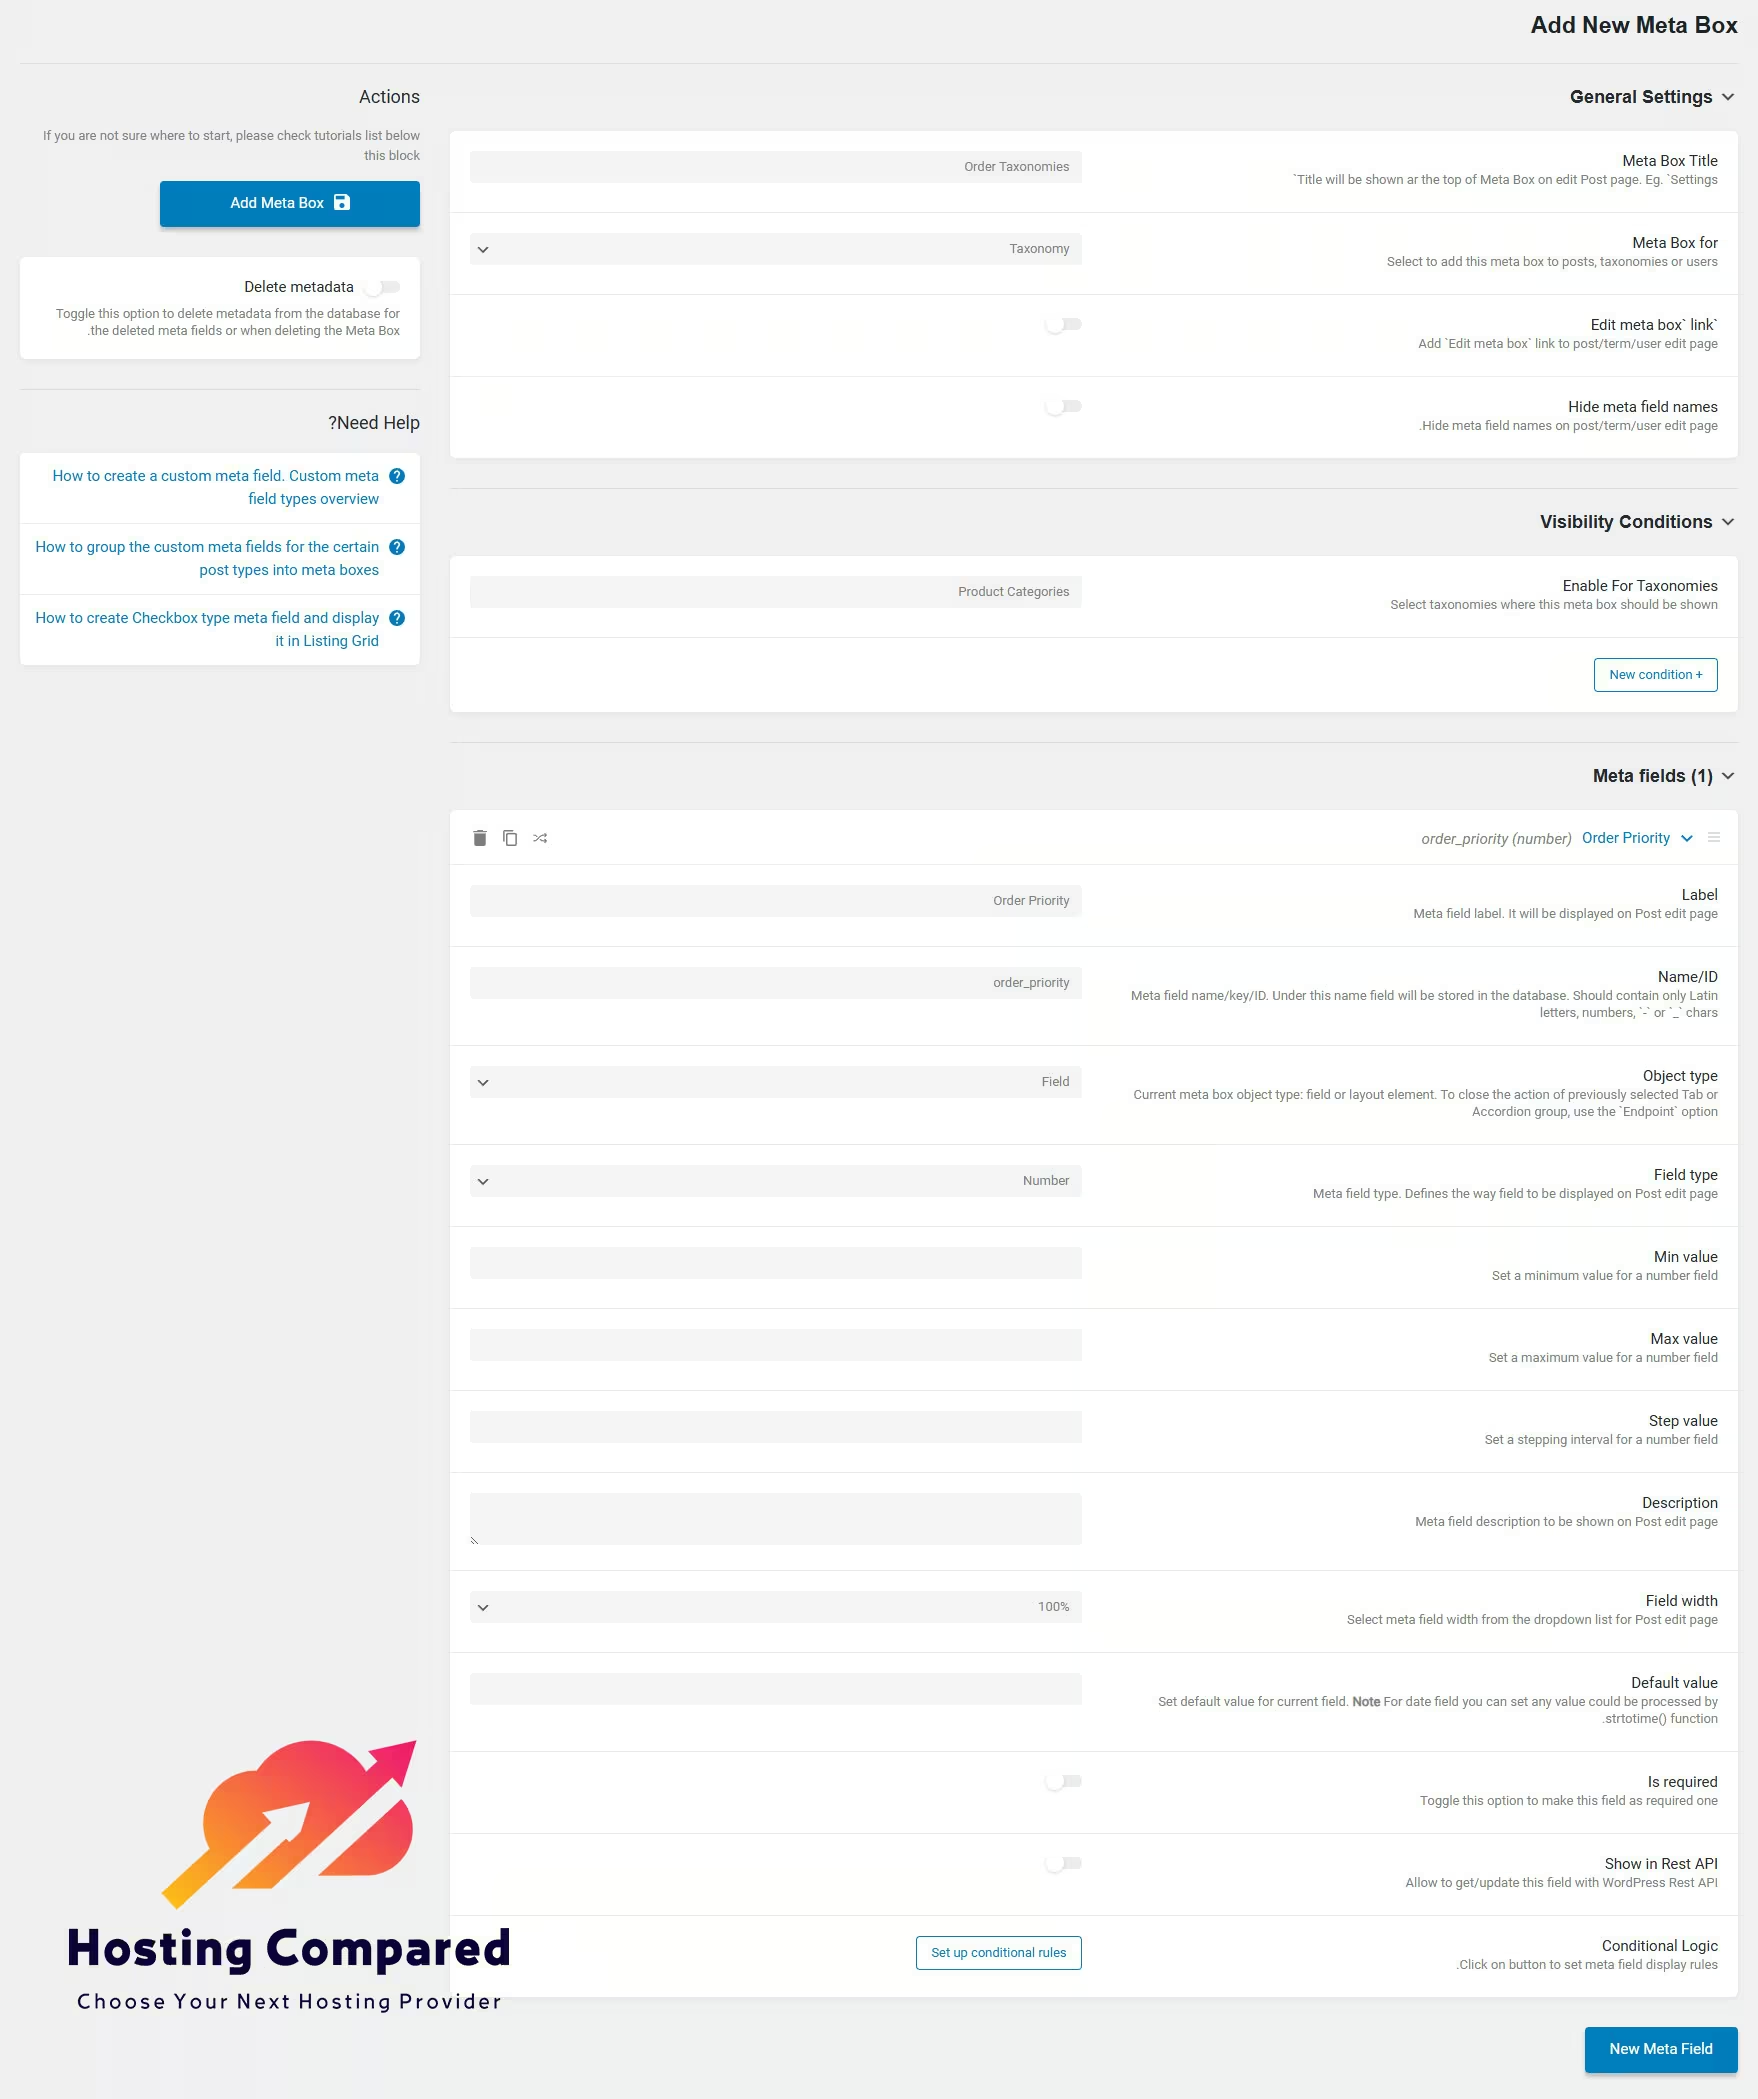
The first step is to create the meta field that will store the custom order value. We will name this field order_priority.
- Navigate to JetEngine Meta Boxes: In your WordPress dashboard, go to JetEngine > Meta Boxes.
- Add a New Meta Field: Scroll down to the Meta Fields section and click New Meta Field.
- Select Your Taxonomy: Find the taxonomy you wish to order (e.g., “Product Categories” for WooCommerce, or your custom taxonomy).
- Configure the Field:
- Label: Order Priority
- Name/ID:
order_priority(This is the crucial key used for sorting). - Field Type: Select Number. Using the Number type ensures accurate numerical sorting.
- Min/Max Value: (Optional) You can set a minimum value (e.g., 1) for better data control.
- Description: (Optional) A brief note like “Lower number means higher priority (appears first).”
- Save Changes: Click the New Meta Field button to save your new meta field.
Step 2: Assign Priority Values to Taxonomy Terms
With the meta field created, you must now assign a numerical priority to each term within your chosen taxonomy.
- Access Term Editor: Navigate to the standard WordPress menu for your taxonomy (e.g., Products > Categories for WooCommerce, or the equivalent for your custom taxonomy).
- Edit Terms: Click Edit on any term you want to order.
- Enter Priority: Scroll down the edit screen until you find the Order Priority field.
- Enter a numerical value. For example, use
1for the term that should appear first,2for the second, and so on. - Tip: Leave gaps (e.g., 10, 20, 30) to make it easier to insert new terms later without renumbering everything.
- Update Term: Click Update to save the priority value. Repeat this process for all terms you wish to include in the custom order.
How to Order WooCommerce Categories with JetEngine
The most common use case for custom taxonomy ordering is for WooCommerce Product Categories. This section details how to display these categories in your custom order on the front end using the JetEngine Listing Grid.
Step 3: Create a Listing Template for Taxonomy Terms
To display the terms on the front end, you need a Listing Template that defines how each term looks.
- Create New Listing: Go to JetEngine > Listings and click Add New.
- Configure Listing Source:
- Listing Source: Select Terms.
- From Taxonomy: Select your target taxonomy (e.g., Product categories).
- Listing Name: Give it a descriptive name (e.g.,
Product Category Listing). - Design the Listing: Use the Elementor or Gutenberg editor to design the layout for a single term. You will typically use the Dynamic Field widget to display the term name and the Dynamic Image widget for the term thumbnail.
- Save Listing: Save your new Listing Template.
Step 4: Display and Order the Terms in a Listing Grid
Finally, you will use the Listing Grid widget on any page to display the terms, applying the custom order based on the order_priority meta field.
- Edit Target Page: Open the page where you want to display the ordered categories in Elementor or Gutenberg.
- Add Listing Grid: Drag and drop the Listing Grid widget onto the page.
- Select Listing: In the General settings, select the Product Category Listing you created in Step 3.
- Configure Query Settings: This is the most critical step for ordering:
- Scroll down to the Query section.
- Source: Ensure the source is set to Terms.
- Order By: Select Meta Value (Numeric). This tells the widget to sort by a number stored in a meta field.
- Meta Key: Enter the exact ID of your meta field:
order_priority. - Order: Select ASC (Ascending). Since a lower number means higher priority, ascending order will display terms with priority 1, then 2, then 3, and so on.
- Publish/Update: Save your page. Your WooCommerce categories (or custom taxonomy terms) will now be displayed in the exact custom order you defined using the
order_priorityfield.
Summary of Configuration
The table below summarizes the key configuration points for implementing custom taxonomy ordering with JetEngine.
| Component | Setting | Value | Purpose |
|---|---|---|---|
| JetEngine Taxonomy Meta Field | Label | Order Priority | User-friendly name in the backend. |
| JetEngine Taxonomy Meta Field | Name/ID | order_priority | The unique key for sorting. |
| JetEngine Taxonomy Meta Field | Field Type | Number | Ensures accurate numerical sorting. |
| Term Edit Screen | order_priority Value | 1, 2, 3, 10, 20, etc. | The manual value defining the term’s position. |
| Listing Grid Query | Source | Terms | Specifies that the grid is displaying taxonomy terms. |
| Listing Grid Query | Order By | Meta Value (Numeric) | Instructs the query to use a numerical meta field for sorting. |
| Listing Grid Query | Meta Key | order_priority | Links the query to the specific priority field. |
| Listing Grid Query | Order | ASC (Ascending) | Ensures terms with lower numbers appear first. |
By following these steps, you gain complete, manual control over the display order of your taxonomies, moving beyond the limitations of default WordPress sorting and creating a more tailored user experience for your website visitors.